See "Employee Entitlement," to input specific leave days

Image 1
Creating a leave-
Establishing a leave involves stating the name of the Leave Category that is being entered. In the upper middle portion of the page, the category types are displayed. The leave category name, is going to be one of these types. For example, if a new company Time Off is being entered that is a company wide Time-Off specific to your company, the Leave category name for it would be inclusive of what type leave category it is, for instance the name may be, 'January 2019 Company Wide Time-off', indicating who the leave applies to, the entire company, and what type, or category, of leave it is, time off.
Another type of leave that can be created is one that tends toward the individual. For a leave can be created titled "February 2019 Sick Leave". With this leave, when an employee has a need for sick leave in the month of Febraury, the leave that would be chosen to be applied to the leave request would be this leave, 'February 2019 Sick Leave'
After a descriptive Leave category name has been chosen and entered, it is neccassary to indicate if the leave type is a paid or an unpaid variety. To do so, click on either the 'Paid' or 'Unpaid' circle tabs adjacent the 'Leave Type' phrase, which the specific leave is. For instance, in the example above, the 'January Company Wide Time-Off' may be a paid leave, and therefore when being established in the system would be established as a 'paid' leave type. Conversely, the example of the 'February 2019 Sick Leave' may be an unpaid leave type and therefore, when it is being established in the account, would be established as an 'unpaid; leave type. Make the choice of 'Paid' or 'Unpaid' for each leave that is being entered or created.
After naming the leave and specifying it as a paid, or unpaid leave type, the final necessity for creating a leave is to choose the category type that the leave is. A leave can be one of the five options listed, whether Sick Leave, Vacation Leave, Regular Leave, Maternity Leave or Time-Off. In the initial example above, the 'January 2019 Company Wide Time-Off', when being created, would be classified as a 'Time-Off' category type, when the category type for its' entry is being chosen. When the correct category type for the entry being made has been chosen, click on the blue, 'Save' button to create the entry. Once created it will appear in the Leave Category List, directly beneath the Add Leave Category section; This can be seen in the lower section of Image 1.
There is also the feature of Rollover Leave, as seen directly beneath the category type statement in Image 2. Rollover leave applies to the continuation of an employees leave from the previous year or previous leave period, which has not been used by the employee. For instance, if an employee has 21 leaves days per year within their contract and they have not used them then if the Roll Over Leave is enabled those unused leave days will be appendixed to their next leave period, and not be lost to them; these days will be saved. Therefore, leave days can be accumulated by employees once Roll Over leave is enabled for the specific leave being entered or edited. 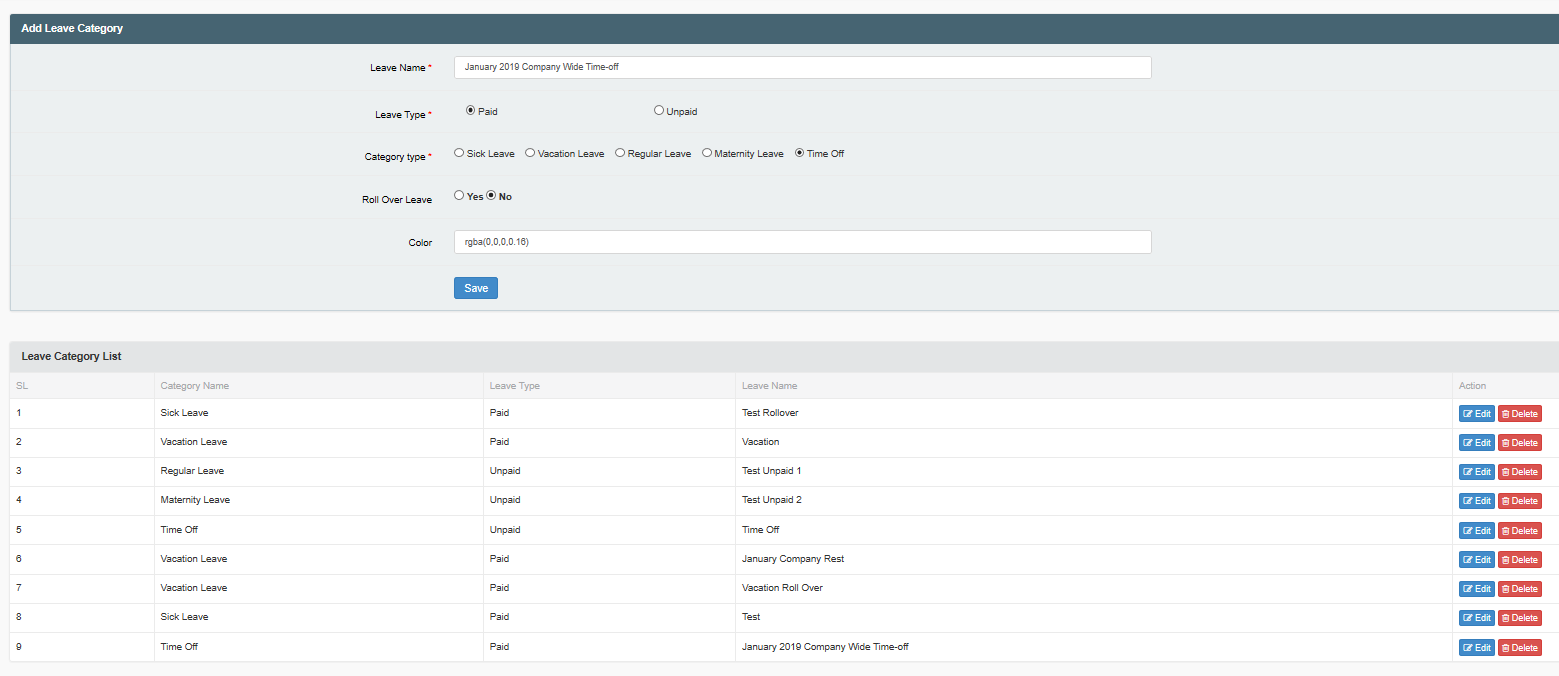
Image 2
The process of adding leaves, should be repeated, until the leaves needed throughout the length of the incurrent year have been created.